So You Want to Build an Organic Vegetable Garden…
It’s easy enough to say you want to build an organic garden, but how does one actually get started? Before I get into my four beginning principals, let me say that these directions I’m writing are applicable to anywhere: backyards, smallholdings, allotments, farms. You can even apply them to containers you might only have space for on your apartment balcony. I’ve helped build and design gardens from small window sill pots to 200 acre properties. The elements are the same. Stick to the plan and you won’t go wrong.
Four Basic Produce Gardening Principles
There are four basic initial principles that I teach people to take into account before they start any type of produce garden. They are pretty much the integral infrastructure in my method of food growing, something that can be reflected back on throughout the life of the garden at any stage. They are…
They will and can make a huge difference to your garden. Not taking them into consideration before you start can cause you to pull your hair out. I’ve made mistakes in the past and have had to redo a few things because I just jumped in feet first. Just sit back. Relax. Look at your intended grow area and picture in your mind what you’d like to see there. Draw up a map of the area, the directions, where the water is, any major or influencing topography, and the general direction of the prevailing wind. If possible, I recommend doing this little ritual a few times over a few days so you really get a feel for the area and its personality over the different times of the day. Don’t bother drawing up a map every time, just breathe and get a feel for the place.
I’ve had people roll their eyes at me when I suggested that they “meditate” on their prospective vegetable gardens. Fair enough. It might not be something that everyone wants to do. But I cannot overstate the benefits of doing so. Part of my methodology of growing is establishing a connection to not only my food but to the land itself, a “re- connection” if you will. As new age or hippy as this may sound, it is an intrinsic truth inside all of us. We are part of the world and its system, just like ants, trees, rocks, or lakes. But for now, let’s concentrate on getting this thing up and running.
Location
Location is the first thing to look at when planning a garden of any kind. You need a somewhat open space that has a nice air flow and at least 6 hours of direct sunlight. Dappled light is fine as long as there is enough to promote growth in your plants over the course of the day. Stand in the middle of the area and relax. Listen to it—its sounds, its hum. Look at the differences in height of the surrounds. Take into account the shade of surrounding or nearby trees and their affect on the beds. How big are they? If you’re going to plant directly into the ground, you’ll have to accommodate for the trees’ water usage. A good size tree will take up to 200 litres from the ground on a daily basis. Here’s a good checklist to go through when surveying and planning your garden. Plus, is it close to your home? Is it a chore to walk the distance? What if it’s raining?
- How much (if any) shade does the area get?
- What times of the day does it (shade) occur?
- How much exposure is there on the beds from 11am to 3pm, the hottest hours?
- Are there any deciduous trees? Does winters loss of foliage make a difference between the amount of winter and summer sun?
- What shelter will those trees give with winter frosts or snow?
- Take into account the arcs of the higher sun in summer and the lower sun in winter and how much difference in sunlight there is between the two seasons.
Water
Water is the most important resource that we have on earth, because nothing can survive without it. Don’t forget that less than 5% of the Earth’s water is fresh water and much of that is unusable due to pollution. So using less is obviously a bonus, and creating a system that harvests a source for our own use without the reliance on utilities, big business, etc. is worth a major pat on the back. First, let’s consider the following before we get digging:
- How close is my main water source?
- Will I be using mains or a rain/tank water?
- What kind of water is it? Fresh, chlorinated, fluorinated etc?
- How am I going to get water to my garden?
- Will I be able to water in the early morning or later in the evening (the cooler parts of the day) to maximise water usage by plants?
- Will I need to install a gravity feed, dripline, or other water system?
- Will I need to buy a water tank?
- Could I build a dam or pond to catch water?
- Can I build multiple catchments to catch overflows?
- What about building swales, tree pans, or berms?
Wind
Wind direction is something that a lot of people either ignore or they just don’t think it matters when it comes to their gardens. Exposure to winds can dehydrate plants and soils, knock them over, create windfall fruit, or just blow soil and plants away. Diffused, it can also strengthen trees by encouraging trunk strength in order to adapt to the windy conditions. Wind is a part of the natural weather cycle, and it’s something that we can integrate into our system so that it works for us, not against us. The main mistake people make with a dominant wind is trying to “block” it when they should be trying to “diffuse” it. But first, what wind questions should you ask yourself when you’re planning a new garden?
- What direction does the prevailing wind come from?
- Take into account, hot northerlies and cooler southerlies.
- Wind across any body of water will cool, which is great for summer seating.
- What natural windbreaks exist on site?
- Will I be able to build or plant any windbreaks?
Land
Lay of the land was a huge consideration for me when I started my vegetable garden, mainly because the quarter of an acre that I’d chosen to grow on had flat patches, inclines, declines, dry bits, bits prone to flooding—the whole nine yards. I had to draw up an initial map of what I was dealing with and stand (literally) in that field for hours, watching where the sun shone, where it didn’t, what was sheltered, what had cover and how all the other elements interacted with it as a whole. This is probably the most important aspect of garden design as it will dictate the design you construct. Take your time, breathe, meditate on it, leave it if need be, then come back again.
The topography of any garden will dictate the type of bed system you grow: raised beds, no dig, containers, or directly into the soil. You can use any of these, but you might have to “tweak” them a little to fit in. Not everyone has a nice flat patch to grow on.
Below is a quick diagram of a typical backyard, illustrating the factors I’ve mentioned. This is actually a suburban job I recently built for a friend. There were big trees next door (on the west side), inclined ground towards the front (near the house). Basically everything came into play with it. We opted for an in-ground bed as the soil was great. After we’d tilled the area, we formed north –south rows with the pathways in between mulched to a level of around 75mm, pretty much like my own large vegetable garden at home.
{Editor’s note: 75mm is just shy of 3 inches. The author lives in Australia and therefore uses the metric system. Since the U.S. is one of two major countries in the world refusing to use the metrics system, we did not ask the author to change his measurements to the Imperial system. Here is a quick and easy conversation site if you need one. http://www.metric-conversions.org/length/millimeters-to-inches.htm}
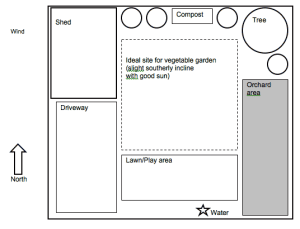
In short, this was relatively easy and is applicable to most of the backyards I see. There were a few evergreen trees along the back fence that threw a bit of shade on the vegetable area during winter, but not enough to deter growth. It had a nice northerly pointing aspect. Water was close enough to only need a regular garden hose with watering. The east side had good sunlight from about lunchtime onwards so it would be good for fruit trees. The shed and trees along the neighbour’s fence line to the left resulted in dappled sunlight on the patch from about 3-4pm, so that would help reduce any burning effects.
We left a grass/play area for his kids and designated a composting area at the back fence as well.
The only unfortunate thing was that the vertical growing areas like the east side fence and shed wall weren’t really good for growing. They just didn’t get much sunlight at all. But rather than leave them empty, we tried a few climbing natives rather than fruiting plants. We’ll see how they go.
How to Build Your Own Garden Beds
Okay, so you’ve made a plan, decided on an area, sussed your water source, and you’re ready to get building. But, what kind of garden bed will you create? Let’s focus on the three greatest hits in the vegetable growing world. They are:
- Raised beds
- No dig beds
- In ground/direct planting beds
Each bed has its good points. The thing is to choose the best one for the area you have, your needs, your budget, and the look you’d like as well. On my farm, I’ve got raised beds, in ground beds, and no dig beds. I love having a variety. They all work great for me and are suited to their own particular areas. Let’s start.
Raised Garden Beds
Raised beds are often the easiest for people to build. You can use a range of products to build them and if your soil is pretty poor, you can just fill them with good stuff and off you go.
The main building blocks people use for construction are untreated sleepers (editor’s note: the author is referring to untreated wood planks or railroad ties) bricks, stacked stone/rock, or even corrugated metal that can be bought in pre fabricated garden bed forms, ready to fill and grow in. Though the metal ones are easy and aesthetically pleasing, a 3×1 metre bed will cost around $20-$300. In comparison, a sleeper version of the same would cost you around $150.
Let’s go through the basic construction of the most popular mediums.
Sleepers are the easiest in my opinion, I’ve built more sleeper beds than I can remember, and they look great. Most sleepers will come in lengths of either 2.4, 2.7 or 3 metres (meters in American English), if you can build with or join either of these without having to cut them, all the better. Most will be 200mm/20cm in width and will vary in thickness from 50-100mm. For a typical two sleep high bed, 50mm is perfectly fine.
Once you’ve decided on your beds, dimensions (let’s say two beds at 3 x1.2 metres) it’s easy, you’re basically going to be constructing boxes that will be filled with soil. If you’re using hard wood like red gum, you’ll need a good drill to pre drill holes for joining as you’ll struggle to get nails through them. If you’re using a softer wood like pine (untreated of course) you’ll be fine without one, though if you’re using wood screws (75mm) it is easier to pre drill your holes.
So for our bed the length is 3 metres, we’re going two sleepers high, in a nutshell we’ll need…
- X 4 3 metre by 50mm red gum sleepers
- X 2 2.4 metre by 50mm red gum sleepers
- A drill
- A pack of 75mm wood screws (you’ll use at least 25 in construction)
- X 4 100mm wood screws
We’re simply using the 3 metre lengths for the side and cutting the 2.4 metre ones in half to make our ends. Arrange the sleepers in their box shape first. Make sure it’s all ok and then start pre-drilling your holes. Three holes at the end of the 3 metre lengths, coming in 25mm from the end, will suffice. As we’re drilling into the grain on the 1.2 lengths, they won’t require drilling, make sure all your angles are flush and drill the two together. It helps to have a friend to help you out, and make sure you’re wearing your safety gear.
Now we can fit in the other pieces, and we’ll have created a big empty box. You could simply use this, just one sleeper high, but if you’re wanting to grow root vegetables like carrots or potatoes, I’d recommend going two high.
If you go two high, build the second level (empty box) the same way you did the first one, then “carefully” stack them on top of each other. To keep it all in place, simply drill a screw diagonally down at each corner, from the top down into the lower corresponding sleeper. See the diagram below. This screw will keep the sleeps in place. You will need to pre drill it and use 100mm screws.
Take into account the picture below, this bed is exactly what I’m talking about with my building description. Please use it as a visual reference and always double check your measurements before you cut or drill into them. If you don’t, you might be heading back to the store because you cut a sleeper in the wrong spot and created a big piece of firewood. Going on the length of sleepers available to you, you can dictate all kinds of lengths or widths. The main thing is to make sure you have the least possible wastage or leftover wood when you calculate it.
This is an example of a two sleeper high raised bed.

If you’re a confident brick layer, you can build a raised bed from bricks as well, I’ve done a few myself. They are pretty labour intensive, but in the right garden they look great. I’d still recommend going a good 400mm high and make sure you have the cash as you’ll need bricks, mortar, concrete for trench footings, and a brick bolster to cut your bricks in half.
To build something like this, I’d recommend either getting in a professional to do it for you or getting a few tips from a brick layer, watching a few brick laying how-to videos, and having a practice first. It’s easy after you’ve built a few, but if you’re only intending on building one, you want it to look right.
Besser blocks (concrete blocks) can be used in the same way, though the gaps inside them can be tricky. You can just fill them and plant perennial herbs in them like sage or thyme. Again, get a pro or do your research.
Now that you have your beds built, what do you fill them with? This simple question could have a hundred different answers. Different gardeners have their own preferred mixes of garden soils that they like to use. Some people add rock dust/minerals, others add coir (fiber extracted from coconut husks) and other fibrous things. These combinations work well for them, but for me, there’s a simple and easy equation to go by.
- 40% compost
- 30% manure (preferably cow)
- 30% soil
Now by soil I mean the regular old garden soil that you’ll find at your local garden centre. It will (should) have varied things in it already. That’s fine. Mix these three ingredients together the best you can and fill your raised beds with it. Allow it to settle by about 50-75mm in a two sleeper high bed over the next couple of weeks.
Don’t panic about getting the ratios exact. Do your best and it’ll be fine. You can plant directly into this mix. Typically it will be a neutral pH. You won’t need to add fertiliser, lime, sulphur, potash or anything else. This is its beauty, its simplicity. It’s ready to go, as is.
At the end of each season/year, you will have to top up your beds a bit and add back the goodies that your vegetables have taken out. You can use the same equation above, but use a smaller amount. Also, if you’re concerned about your pH at the end of the growing season, you can get an easy to use pH kit or take some soil (about half a cup) to your garden centre. They might test your pH for free.
But wait, how much soil do you actually get? We just need to calculate volume: length x width x depth. So for a 3 x 1 metre bed that is 400 mm deep, it would be 3 x 1 x .4. That gives us an answer of 1.2, which is 1.2 cubic metres of soil. Calculating it to the top of the bed ( the whole 400mm) allows for settling, which then will give you a lip on the edge of about 50mm. Perfect!
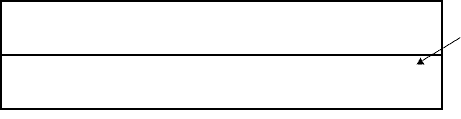
The simple diagram above shows what I mean in regards to leveling your beds, the shortest side (right) should be at least 400mm high to give a good depth to grow in with the other sides height adjusted accordingly to give a level ground for the beds surface, depending on the actual incline of slope. This is applicable to all bed types.
No Dig Garden Beds
No dig beds are pretty easy, and I have to admit a smug content-ness after I build one as I think they just look great. The order of events for building one is a basic layering of media, like a lasagna. Different people use different things, but I generally stick to the same recipe.
- First layer, (on grass or soil): newspaper or cardboard, laid THICK at a good 30-50mm.
- Second layer: compost, mushroom compost.
- Third layer: grass clippings, soft prunings, leaves, or hay if you have none of these.
- Fourth layer: manure, well broken down (cow or sheep). Chicken is too acidic en masse like this.
- Fifth layer: lucerne (alfalfa), hay (without seed heads), pea straw, or sugar cane mulch (When using alfalfa be careful to avoid GMOs!).
This is the basic recipe for layering. You need to water each layer in really well as you go and in between each one you can add things like leaves or grass cuttings if you have them, but don’t go too thick with these, they’re just an addition.
With each layer, aim for a thickness of around 100mm, a bit less for the manure, a bit more for the lucerne etc. Once you get your bed to a good 50cm tall you can water it in again and leave to settle for a day or two before you begin planting, it will sink a bit so don’t be concerned if it looks shorter in stature the next day. Also with the actual dimensions of the bed, you can go as long as you like but try to keep the width to 1 metre max. This is so you can reach the other side of the bed when planting. Otherwise you’ll be going back and forth around the bed or stepping on it and compressing it down. Neither is good.
If you’re building directly onto grass, take into account the type of grass. Blade grass (like fescue) will die off easily under the first layer. Runner grass (like buffalo, couch, kikuyu) will do its best to get through and get into your lovely beds. Mow first on the lowest setting to really get off to good start and make sure the first layer on top of the grass is nice and thick. You can plant straight into your bed when you’ve finished, but I prefer to give it a few days to mingle. It’s up to you.
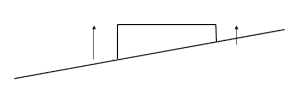
If the area has a slope, you can simply build up one side of the bed to have a level planting area. If you are building one on an incline (or decline, depending on your view), you might want to have the beds running down in line with the slope itself, rather than crossways or parallel to it. This is a bit of a catch 22 with rain. Crossways running beds, with light to medium rain, will act like swales and catch the water, which is great. But if your area is prone to heavy downfalls and flooding, the beds could become mud pits as the water has no direct route to run off. Think about your intended patch, your weather and take all facets into consideration.
What about amounts? How much stuff do you get to build a no dig bed?
For a 4x1x40-50mm bed, you’ll “roughly” need:
- 2/3 of a metre of manure
- 2/3 of a metre of compost
- 2-3 bails of hay/lucerne
- A good 15-20 newspapers or equivalent in cardboard
- Water, hose preferably
- Grass clippings, soft prunings, leaves, nothing “twiggy”
Don’t forget that you can make different garden bed shapes and patterns like circles, spirals. etc.
In Ground or Direct Planting Beds
In ground or direct planting beds mean just that, you’re planning on tilling the soil you have and planting straight into it.
The pro’s and con’s of this are pretty simple. It all depends on the type of soil you have and what’s on top of it, grass, weeds, etc. First, do a few test digs with your shovel at random points on the proposed area and have a look at what’s beneath. If you find that you’ve got a good upper topsoil layer (a good 20cm) you should be okay. If you find that you’re hitting clay, stones, or shale after digging an inch or two, you might want to consider a different option.
You can grow vegetables in heavily clayed soils, but they are a palaver. You’ll have to apply components like gypsum to help break it down and add extra soils to grow in. This is pretty labour intensive and isn’t the best way to go for smaller vegetable gardens.
If, on the other hand, you find that you have a good upper layer of topsoil, then you can till it with a rotary hoe/cultivator, break it up to a fine tilth, remove any weeds/grass/roots and get planting. But, even if your soil’s great, it’s always a good idea to add a bit of compost or manure while you’re cultivating it. Mix it in just to replenish the soil a bit.
The best way to calculate the amount of manure you’ll need is to calculate volume of the bed by 20mm deep. So, to work out the volume of the area, we need to times length by width by depth. So if you have a vegetable garden area of 100 m2, (a bed 10 metres by 10 metres, length and width) that means your calculation will be 10x10x.02, this gives us a total of 2 cubic metres. That’s the amount you’ll need to apply. Easy, eh?
Grass is another issue with this type of growing. Most commercial digs spray the entire area with herbicide, then till for planting. We’re not using harsh chemicals, of course, so we have two basic options.
- Till the area with grass and rake it out after
- Remove the grass first then till
The first is simple enough with blade grasses. Runner types make it a bit more difficult. If you have a friend who can use a rake, you’ll easily get through a typical 10×10 area in a day/. To achieve a fine tilt, till the area with a rotary hoe/cultivator a good 5-6 times. This is best done when the soil is damp but not muddy. Come across the field from two directions to achieve a crisscross effect. Then you just rake out the grass bits and their roots. But do make sure you get it all out. Running grass root systems generally have a few sub layers below ground. If you miss any, it will grow again and be a nuisance.
The second option requires digging down a good 50mm and completely removing the top layer, soil and all. This is easier on your back, as you can use machinery to do it, but take into account the soil you’ll lose. This type of bed would require double the amount of manure/compost to get it on track, i.e. 10x10x.04, 4 cubic metres.
Once you’ve tilled your bed, you’re ready to plant. You can either keep it as one big area for planting or dig out rows with paths in between so you’re not compressing the soil. Like no dig beds, rows can be easier if your area has an incline/decline to it as you can level each bed accordingly. A big area on a slope can be troublesome with water runoff.
If the soil is average in quality, you might need to spread a 50/50 compost/manure mix and turn it over into the soil itself. I would calculate the area to a depth of around 100mm. So a 10×10 metre area would be 10x10x.1, one cubic metre.
This was my first vegetable garden at my farm, a 5×5 metre, in-ground bed.
If that’s the case, you might want to go with a raised bed system, or else if you get a big downpour, most of your vegetables and that wonderful topsoil are simply going to wash away. This happened to me mid construction on one of my vegetable beds and it was heart breaking. I couldn’t do anything to stop it and I had to simply watch it wash away.
If you’re considering building your own vegetable garden, and I hope you are, then hopefully this article has shed some light on how to get started. It’s not that difficult, once you choose an area and get your materials together. You can then build and grow, literally!
Further Reading: